Before you start #
- Windows 10 or 11, x64, with .NET Framework 4.x (included with Windows).
- Fate of the Galaxy 1.1.0 to 1.1.3, or 2.0.2, for Windows with its FSO 26.0.1 engine, installed by Knossos with the game. The game is a separate download from its creators and is not included.
- A native pilot: run the unmodified game once, create a pilot, and exit.
- An XInput gamepad (Xbox-style controllers and handheld PCs in gamepad mode). Connect it before running Setup.
Flight Control is additive. It installs into its own GamepadMods/FotG_Gamepad_Wheel folder and adds two launchers. It does not edit the game's tables, scripts, campaigns or saves, and the original launcher keeps working without it.
Install #
- Install Fate of the Galaxy. Launch it normally, create a pilot, and exit.
- Download the Flight Control ZIP and extract the whole folder. Running Setup from inside the ZIP, or copying only the EXE, leaves out files it needs.
- Double-click Setup.exe. It finds common game locations. If it doesn't find yours, use Browse game… and select the folder that contains
kn_portable. - Click Install / Repair. Setup checks the game version (1.1.0 to 1.1.3, or 2.0.2) and engine, backs up existing pilot controls and any earlier Flight Control files, detects your controller and its stick layout through the game engine, and selects it in the wheel's launch profile. Setup shows which engine it found.
- Open Hangar Bay.exe in the game folder. On Deploy, choose the base game or an installed mission pack, then launch Standard Flight or OpenXR VR (preview). Play with Wheel in Setup and the Play with Gamepad Wheel.exe launcher still start standard flight directly.
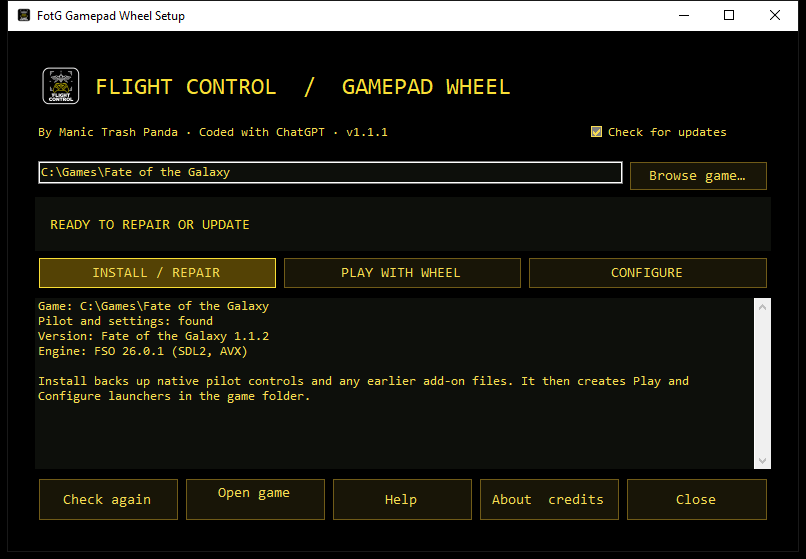
Fate of the Galaxy 2.0.2: select the folder that holds Knossos.NET.exe and kn_portable. Setup installs Flight Control through the game's MyMod and puts Hangar Bay.exe beside Knossos.NET.exe; open Hangar Bay from there.
Keep the small bridge running in the system tray while you play: it reads the D-pad and right stick for the wheels and handles menu navigation.
Close the game before installing, repairing or changing pilot settings. If you create a new pilot later, open the Console in Hangar Bay and press Reserve wheel buttons for that pilot.
Installing without the graphical Setup
Advanced users can run the same Install / Repair from a command prompt in the extracted folder:
Setup.exe --install --game "C:\path\to\Fate of the Galaxy"
It prints each step and exits with 0 on success. Add --skip-pilot-reservation to install the files without changing pilots, then press Reserve wheel buttons in the console for each pilot before testing.
What Install changes
- Copies
GamepadMods/FotG_Gamepad_Wheeland puts Hangar Bay, a copy of Setup for repairs, and the launchers in the game folder. - Uses a separate
GamepadMods_settings.iniprofile for the wheel launcher, backing up any earlier one. - Backs up each existing native v4 pilot, then reserves the A, B, X, Y, LB, RB, Start, L3, R3 and D-pad joystick bindings so they reach the wheel instead of firing the original action at the same time. RT becomes primary fire.
- Leaves keyboard bindings, game scripts, the engine, campaigns and saves in place.
Flight controls #
The default Classic direct (tested) layout steers with the right stick and rolls and throttles with the left.
| Input | In flight (no wheel open) | With a wheel open |
|---|---|---|
| Right stick | Pitch and yaw | Point at a segment |
| Left stick | Roll and relative throttle | Native flight |
| RT | Primary fire | — |
| LT | Secondary fire; hold to repeat where the weapon allows | — |
| A | Target the ship in the reticle | Confirm |
| B | Target the closest ship attacking you | Cancel |
| X | Cycle the target class chosen on the targeting wheel (enemies by default) | — |
| Y | Hold to fire the third gun on B-wings and T-Blade bombers; no action on other ships | — |
| LB | Cycle the secondary bank used by LT | — |
| RB | Change ship mode: Falcon gun control, TIE burst fire, S-foils, or targeting computer | — |
| L3 / R3 | Match target speed / cycle subsystems on the targeted ship | No action |
| D-pad | Tap to open a wheel, hold to look around | Tap the same direction to close |
| Menu / Start | Tap to pause, hold 500 ms to change camera | — |
Prefer the opposite vertical direction? Choose Classic inverted pitch under Flight Axes in the console. Game's saved setup stops applying a Flight Control preset and leaves the game's bindings alone (the stock 1.1 default steers on the left stick and has no throttle axis). Save Wheel and restart the game after switching. To put any axis on either stick, use Custom flight axes.
Command wheels #
Tap a D-pad direction to open its wheel. Let the right stick return to centre, point it toward a segment, then press A. B cancels; tapping the same direction closes the wheel.
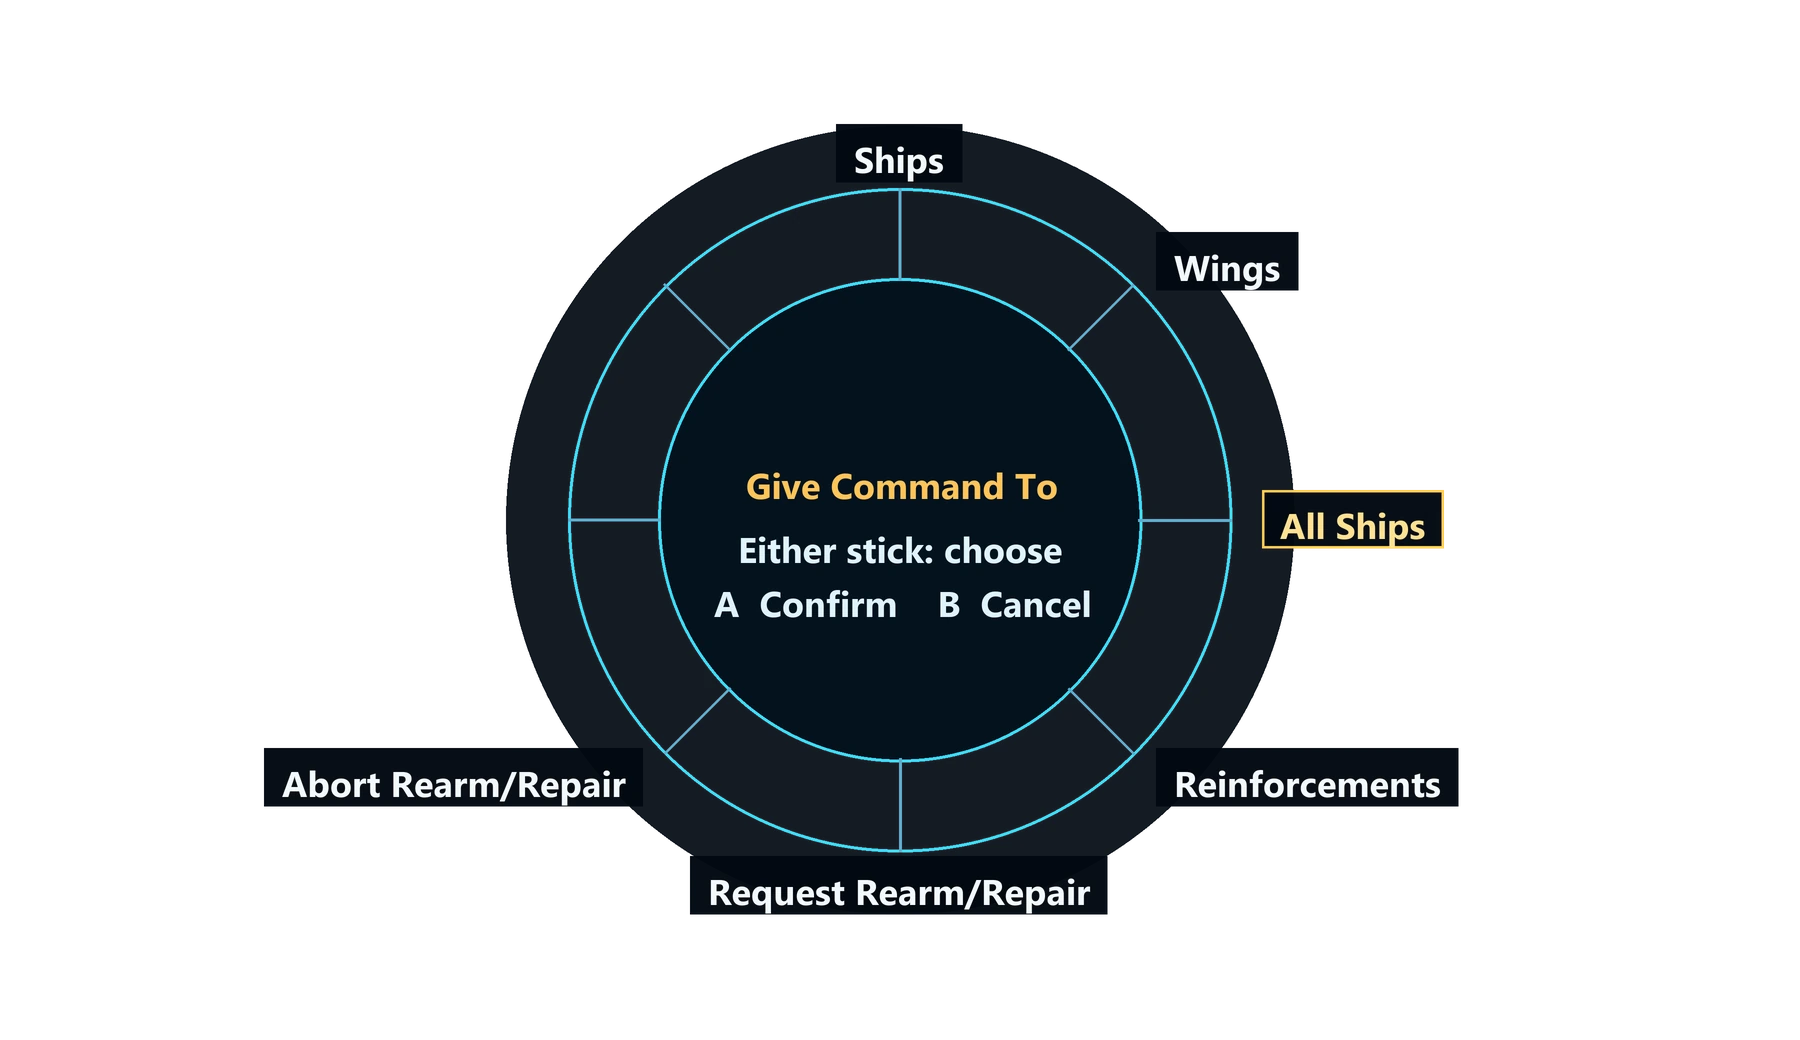
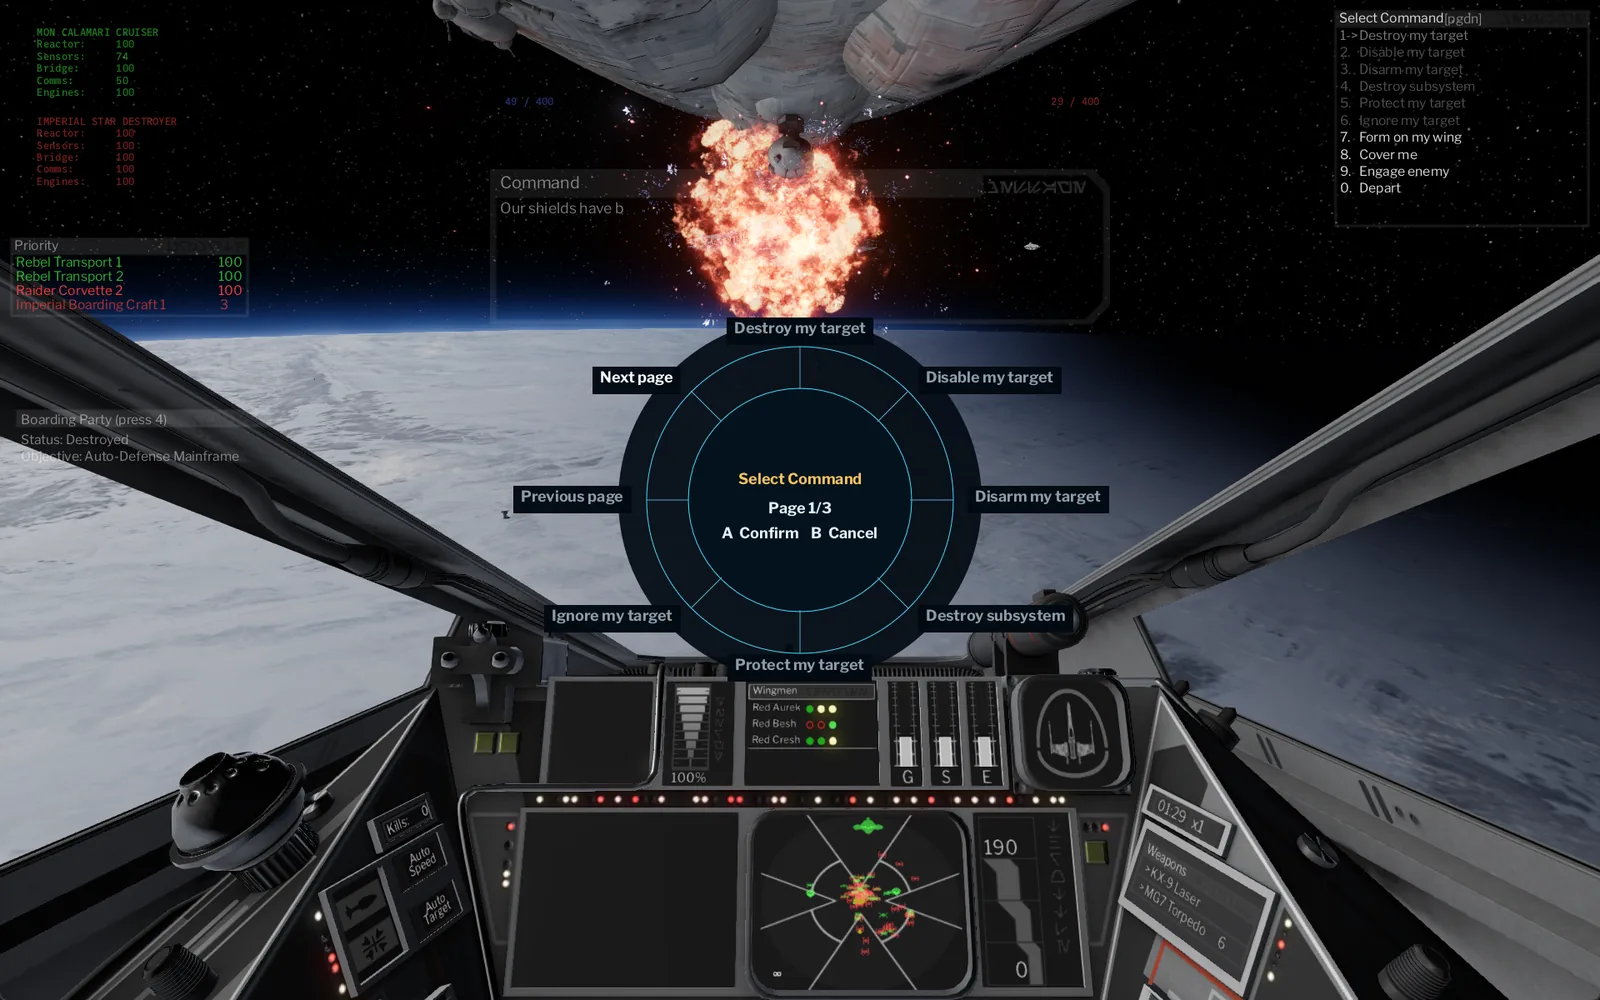
Down — Squad commands
Built from the game's live communications menu, so it shows the same recipients and orders the mission allows: ships, wings, all ships and reinforcements. Lists with more than eight entries get Next page and Previous page segments. Depart and warp orders need a second A. In Assault missions the wheel adds Cycle boarding party task, the same action as keyboard 4.
Up — Ship systems
All energy to shields, weapons or engines; balance energy; equalise shields; transfer energy to shields or lasers; match target speed. Energy actions are single-player only. Press Y on this wheel for Manual power, or X for Shield allocation.
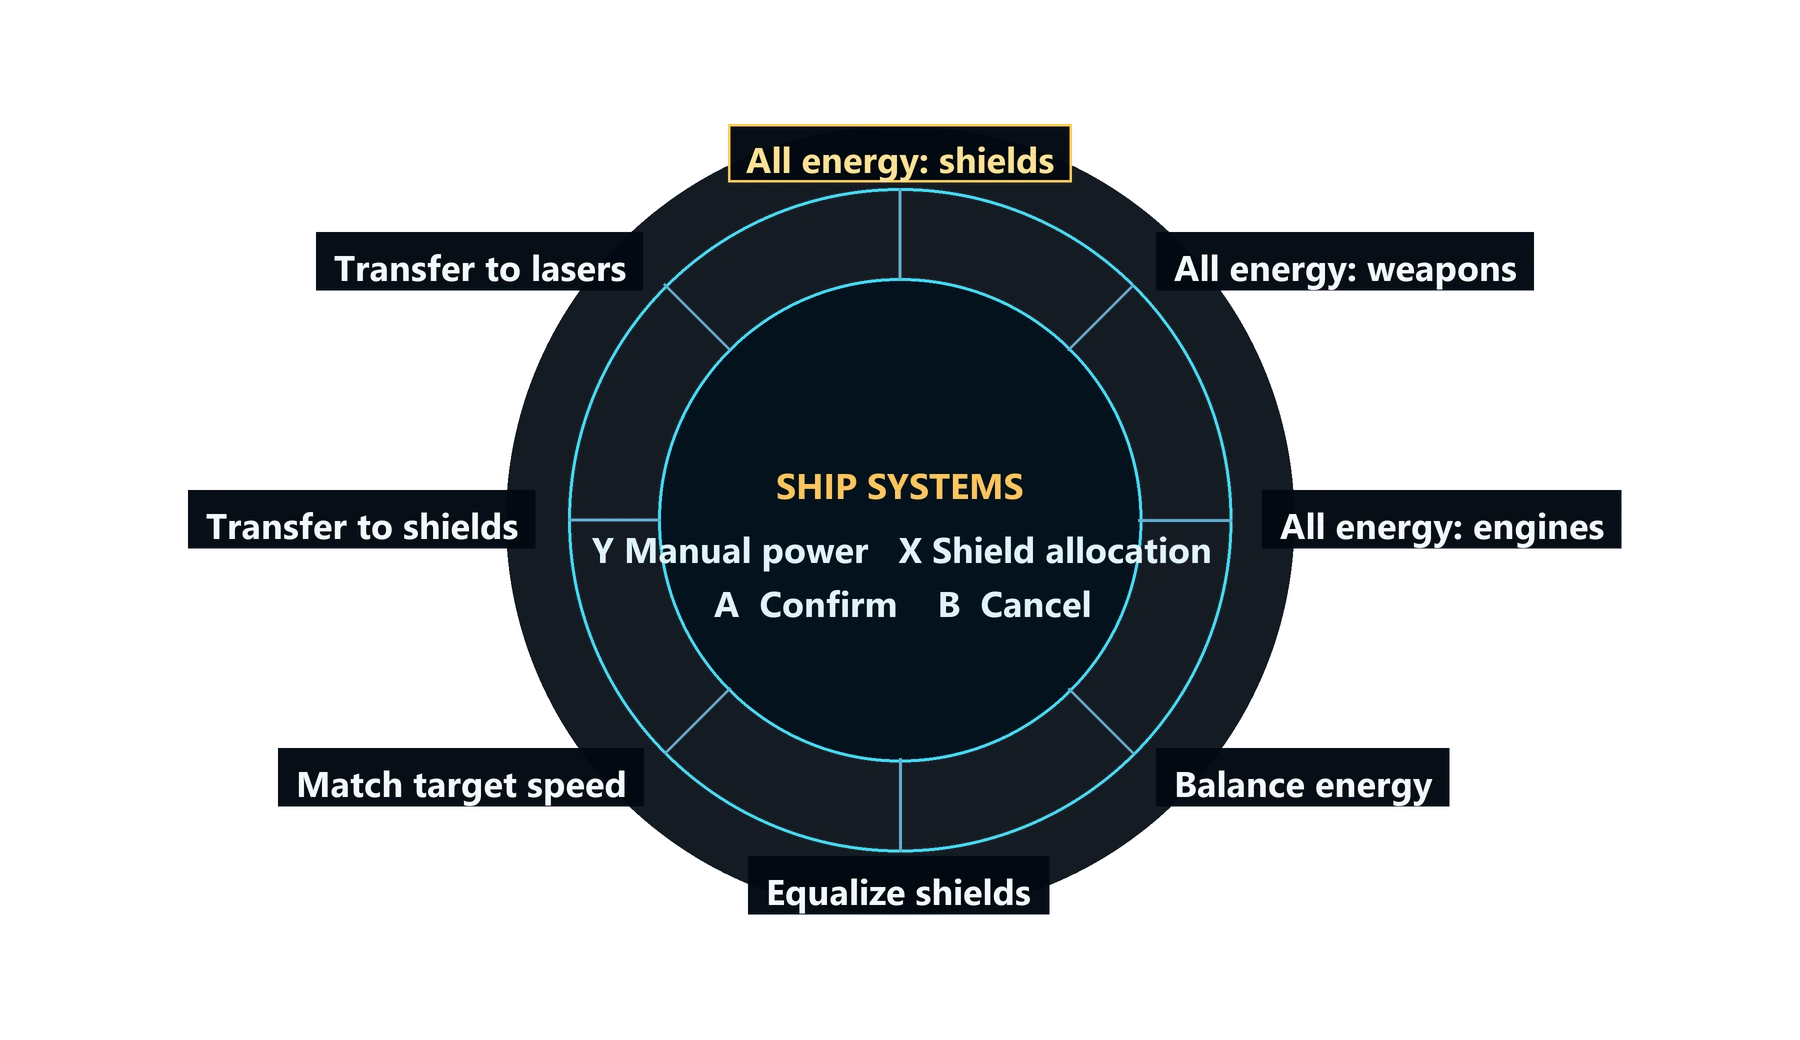
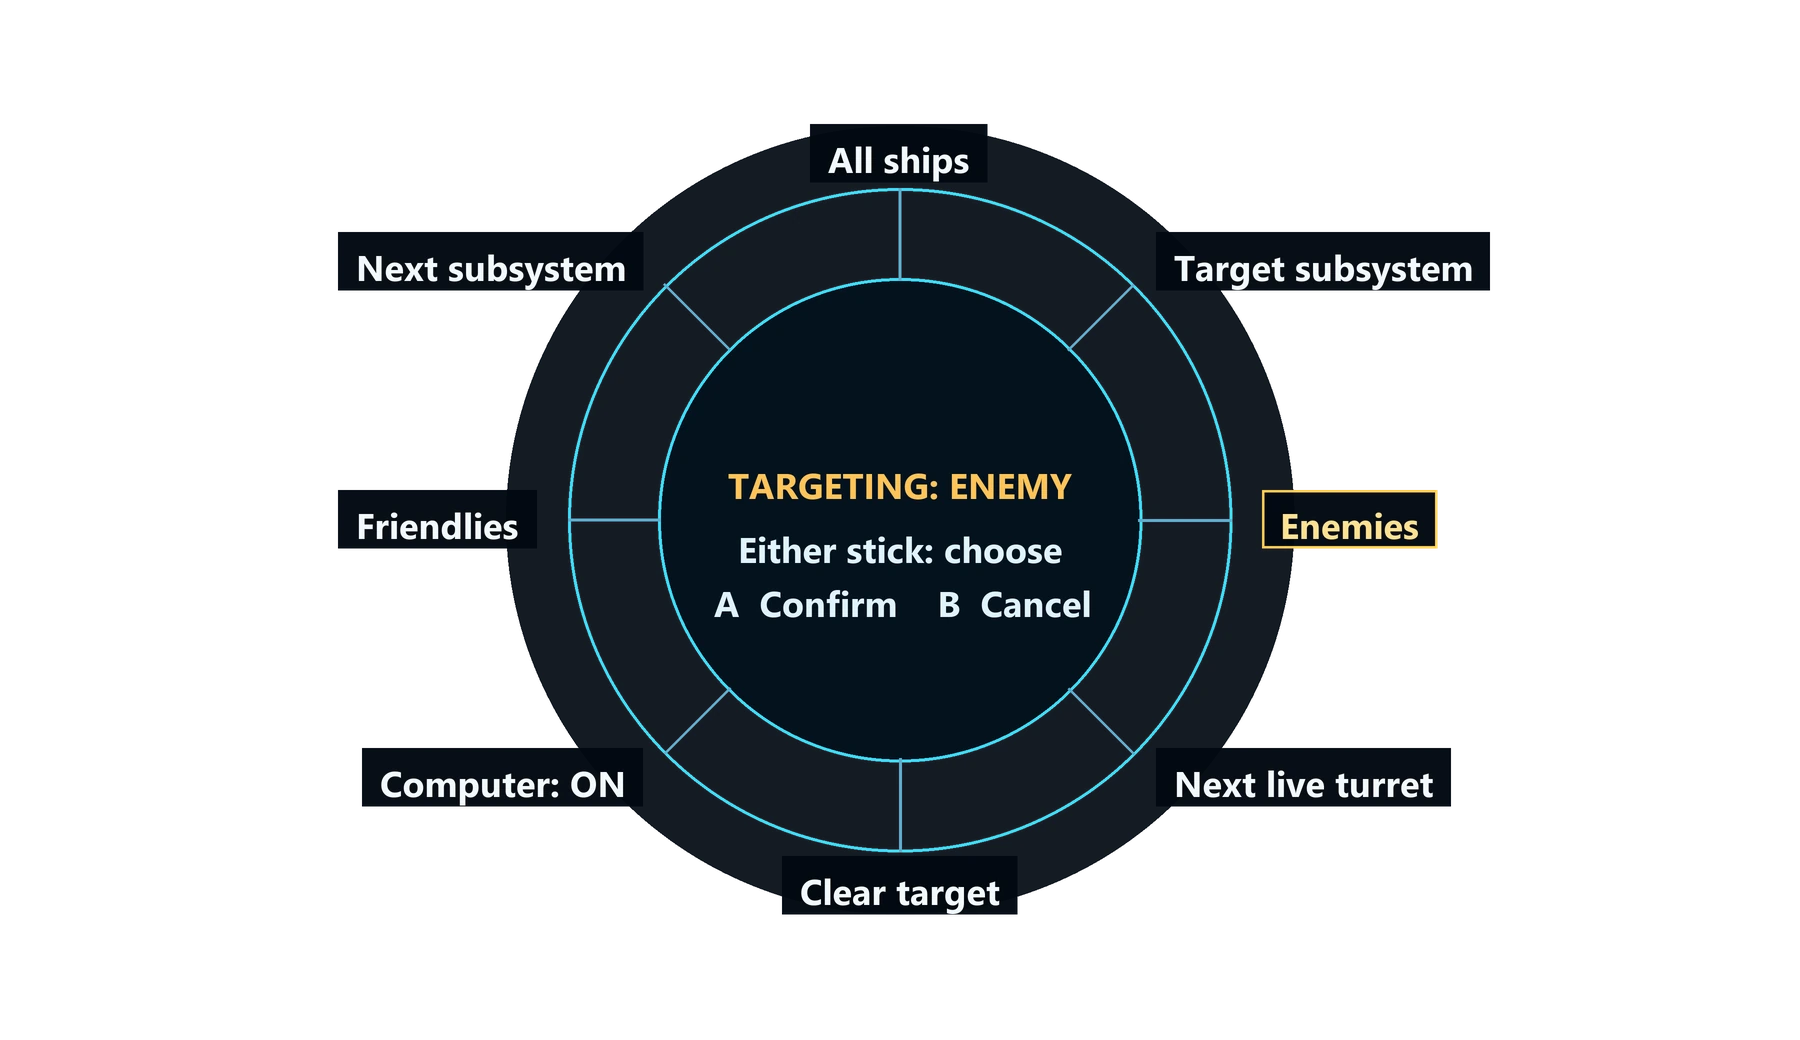
Left — Targeting
Choose which ships X cycles (enemies, friendlies or all ships). Choosing a class does not change your current target. The wheel also offers Target subsystem / Target hull, Subsystem in sight, Next live turret and Clear target. Subsystem choices are disabled when the target has no eligible parts.
Right — Macros and mission commands
Your four macros sit on the cardinal slots; set them in the Console (see Macros). The diagonals open fixed mission-command groups:
- Up-left: responses 1–5
- Up-right: responses 6–0
- Down-left: Dock / nav: contextual Enter, next nav point, autopilot
- Down-right: mission log (F4), fleet info (F11), fleet page (Space)
Choose a group with the right stick and A, then a command with A. B returns to the macros; B again, or D-pad Right, closes the wheel. Numbered responses send the real number keys. Follow the mission's instructions: some missions dock with Enter, others with a number. Campaign planning screens that need text entry or Ctrl+Enter aren't covered.
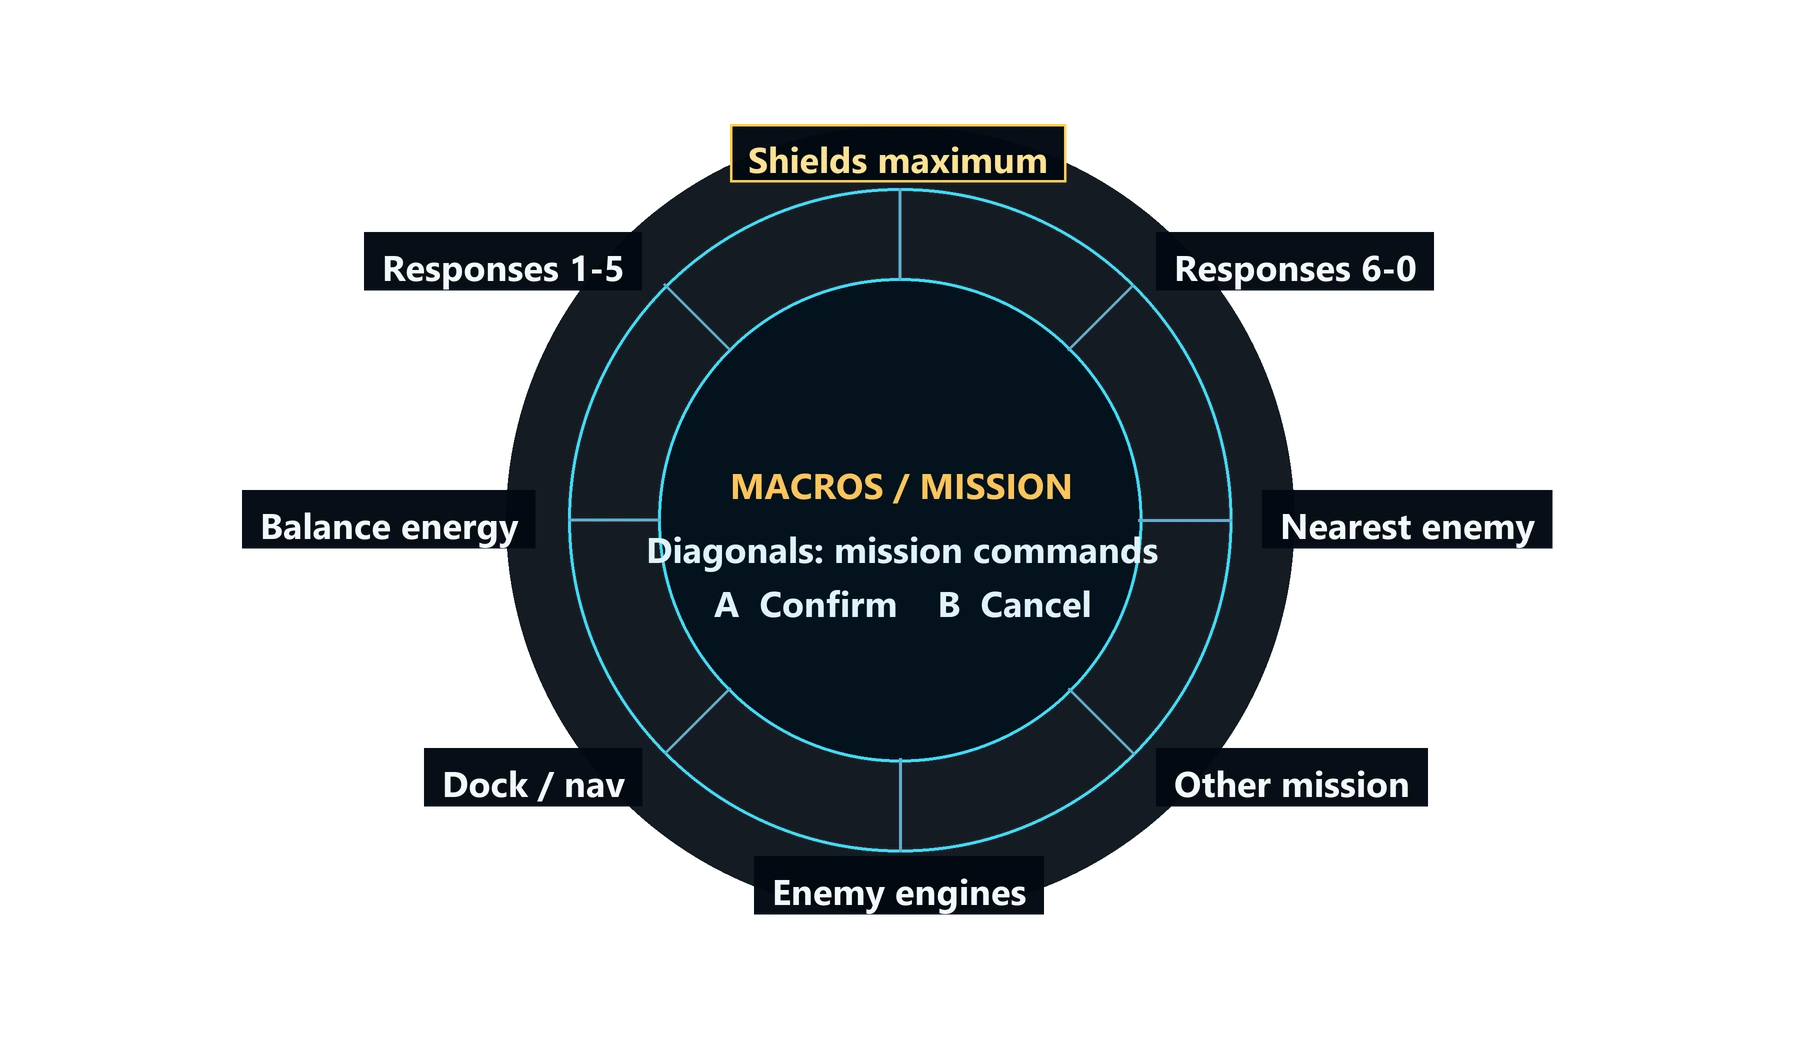
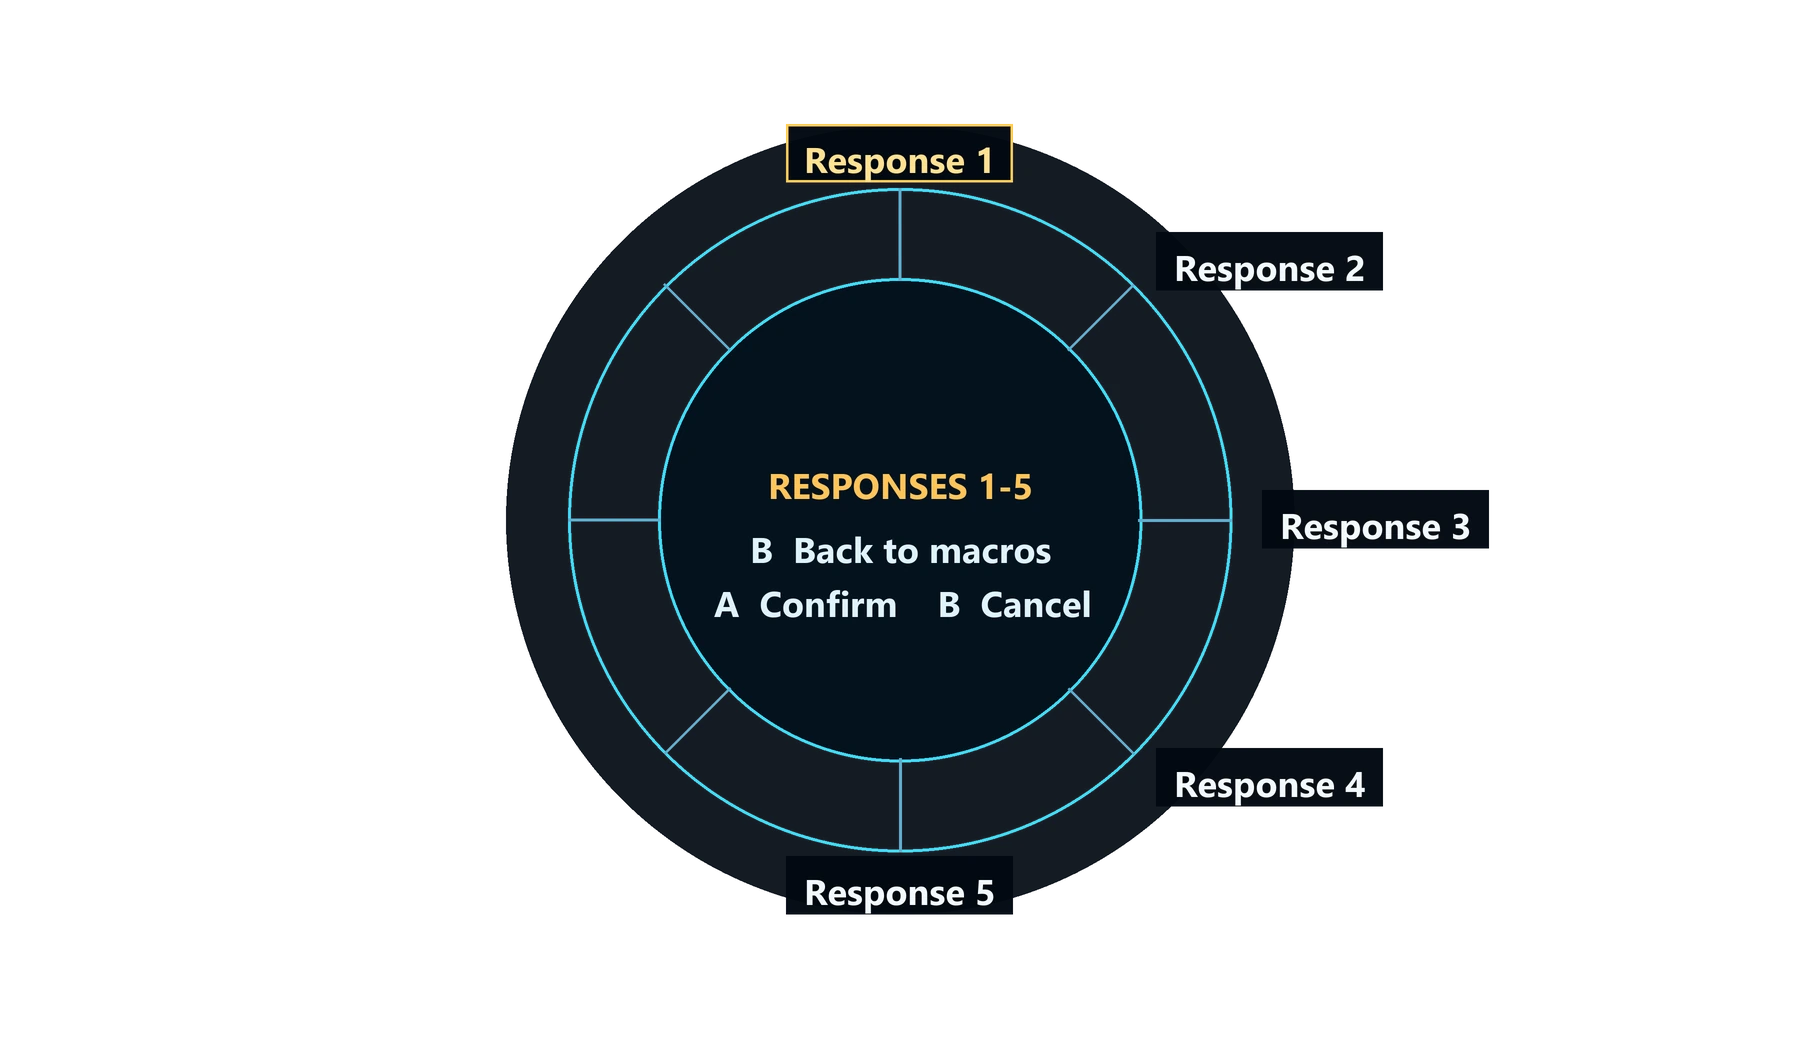
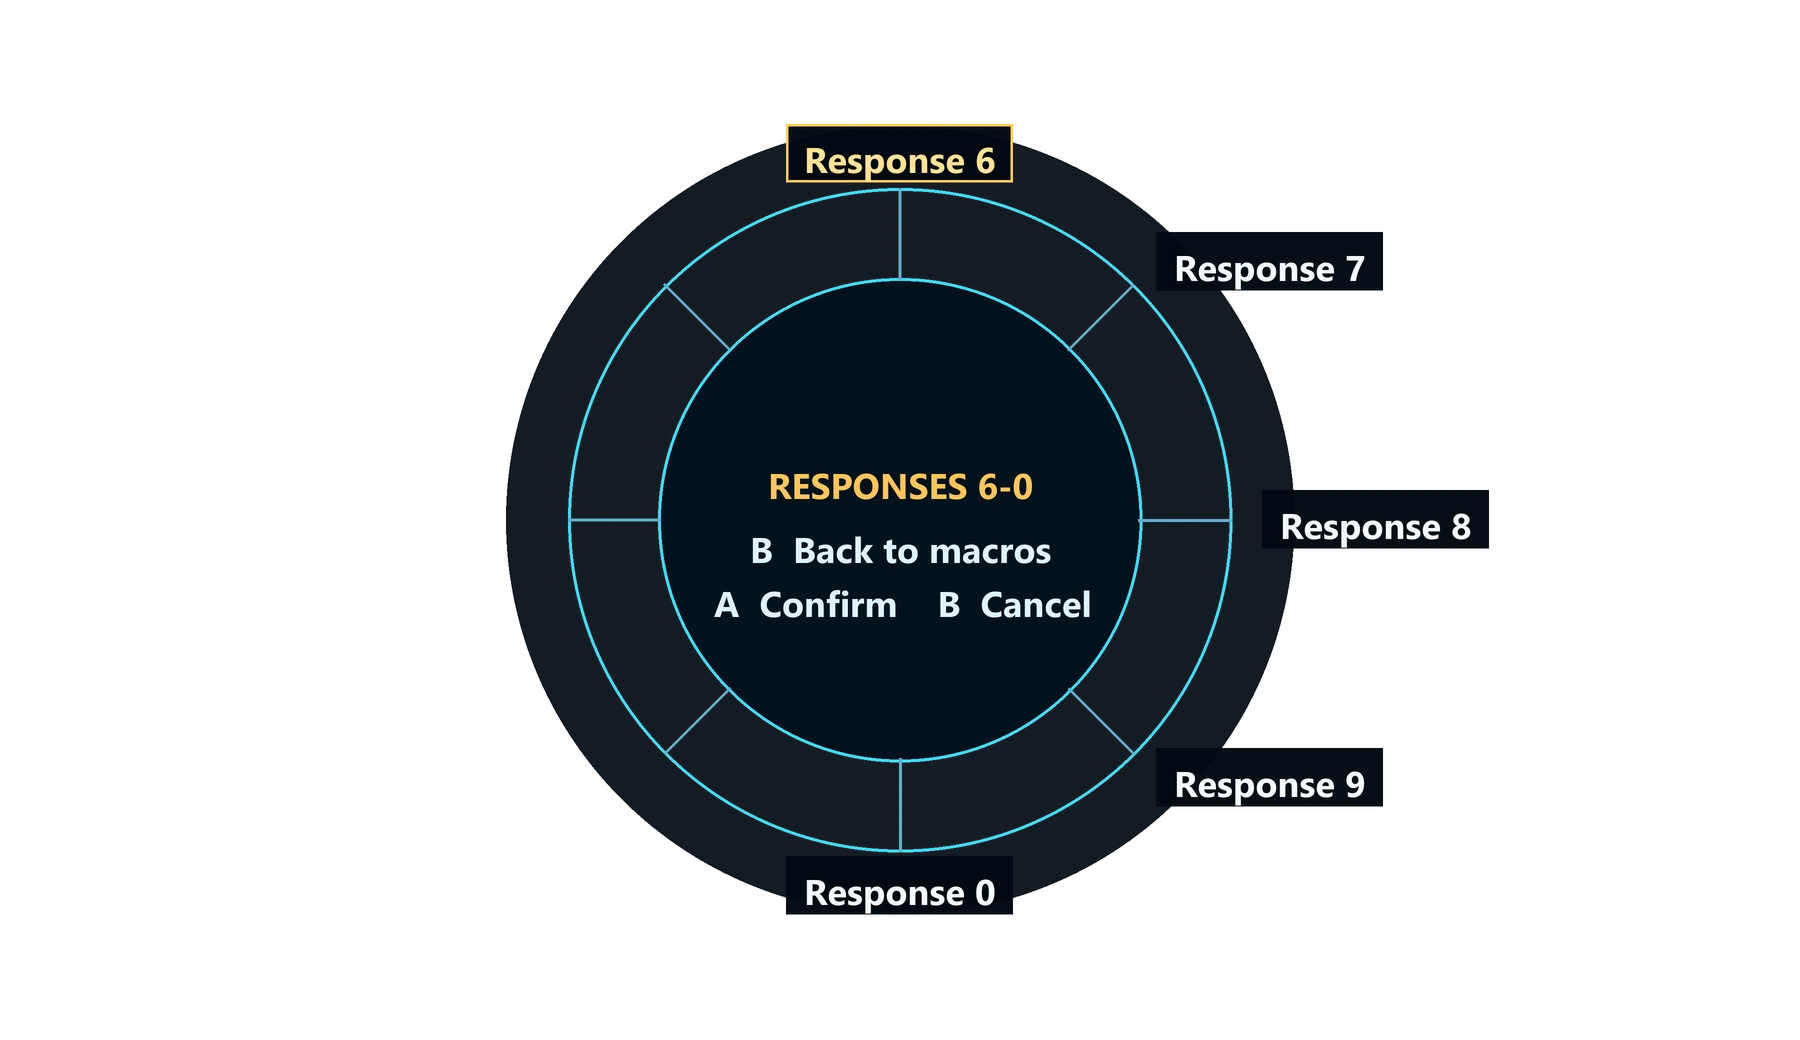
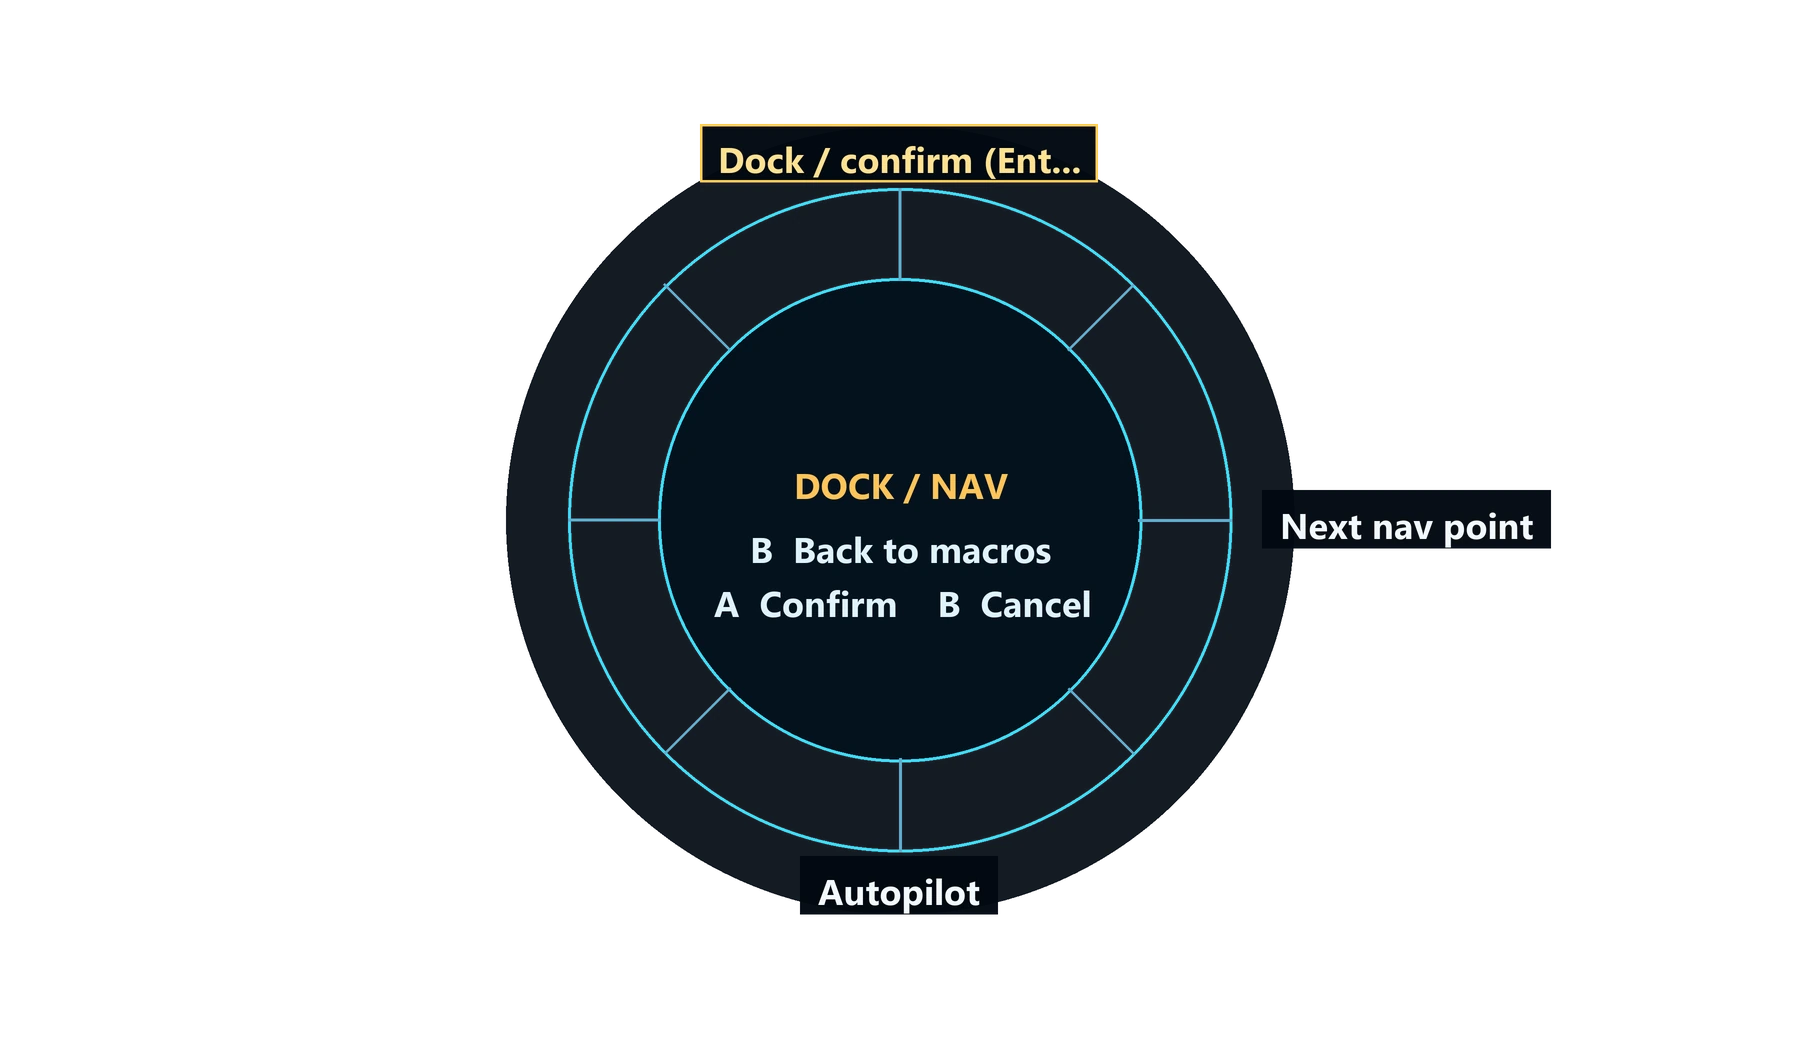
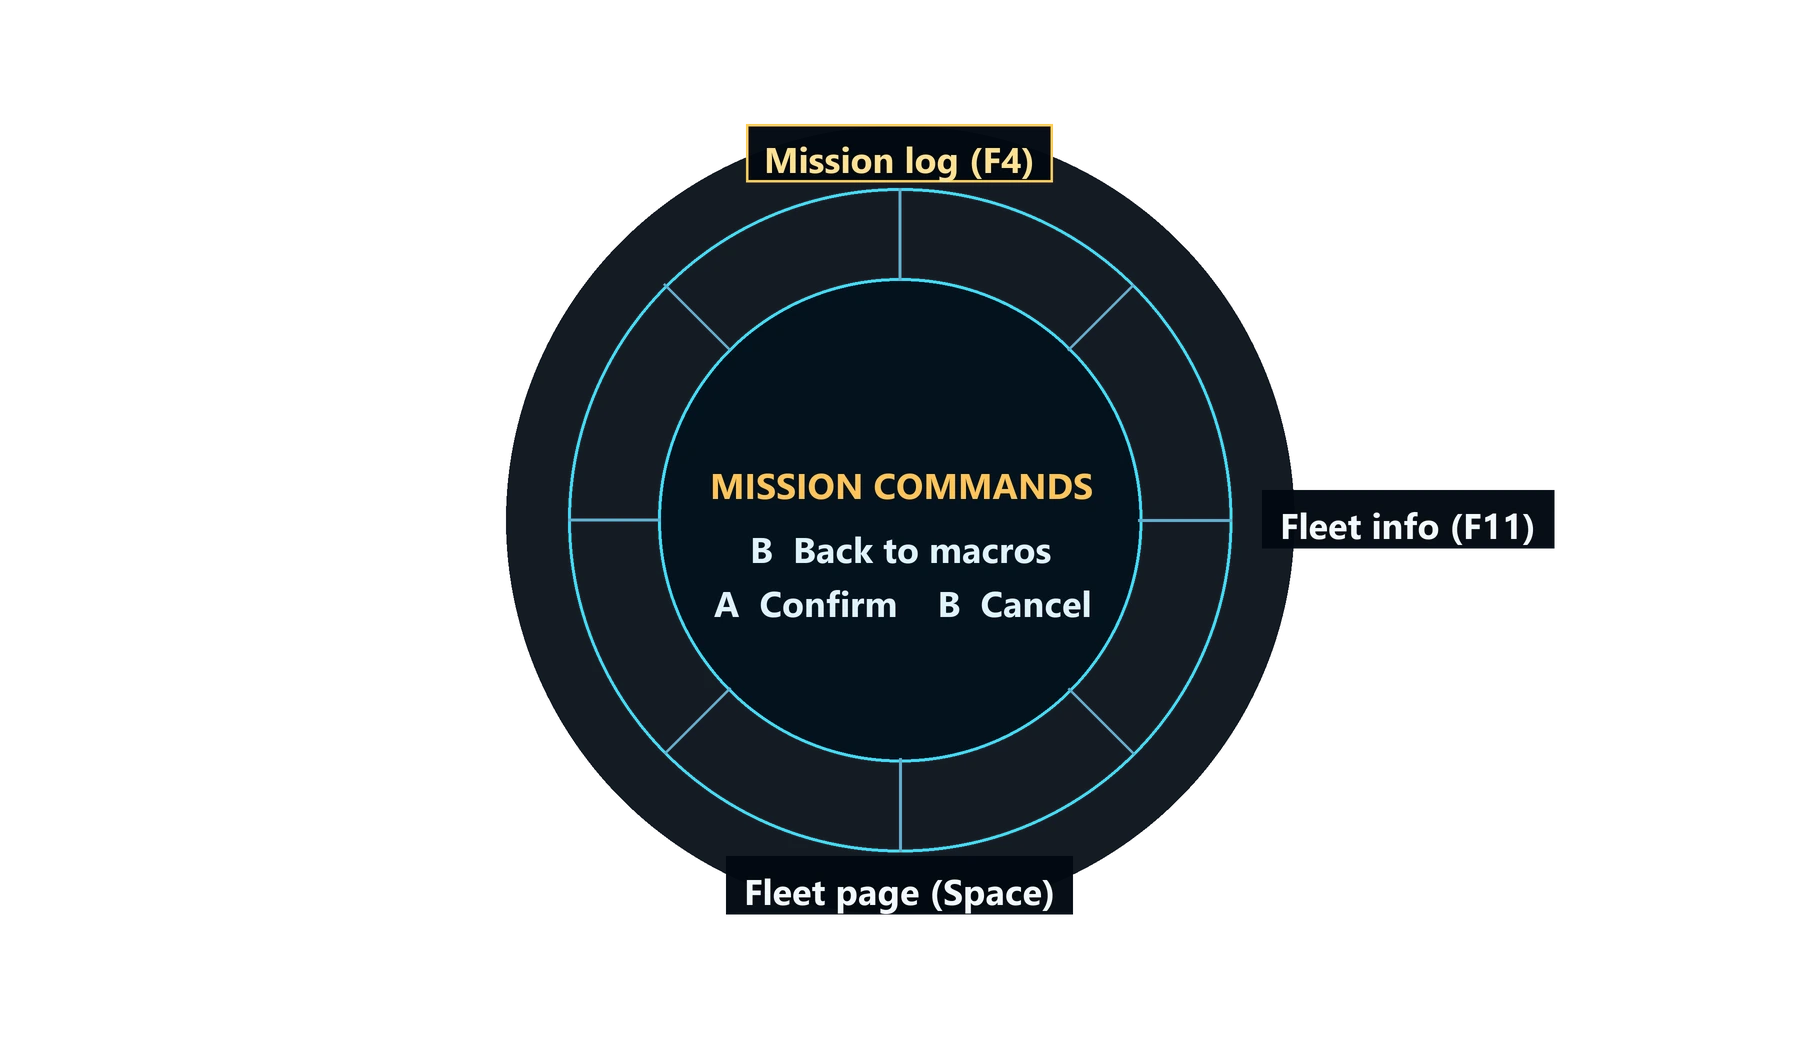
The group wheels, in the order listed above: responses 1–5, responses 6–0, Dock / nav, and mission commands. These illustrations are drawn from the wheel's own code, so labels and layout match the game; the lettering is a close stand-in for the game's font.
Hyperspace shortcut
In flight, press LB + RB together and hold both for 300 ms to request hyperspace with Return, the game's default Engage Hyperdrive key. The game still decides whether a jump is allowed. Release both before trying again. Each shoulder keeps its own action, with a 120 ms delay to tell a single press from the pair. If you rebind Engage Hyperdrive away from Return, the shortcut won't follow it.
Readability
Wheel labels sit on near-opaque dark backplates with bright text and an amber selection outline. In the console, set Wheel Text to Medium (20 px) or Large (30 px), with Bold on or off. Medium Bold is the default; Large may crowd low resolutions.
Manual power #
Set how your ship's energy is shared between shields, engines and weapons without leaving the cockpit. Open the Ship systems wheel (D-pad Up) and press Y. Three arcs appear, one each for Shields, Engines and Lasers, with twelve points each. The total is always 12, as in the game's own energy-transfer system, so raising one arc takes a point from another.
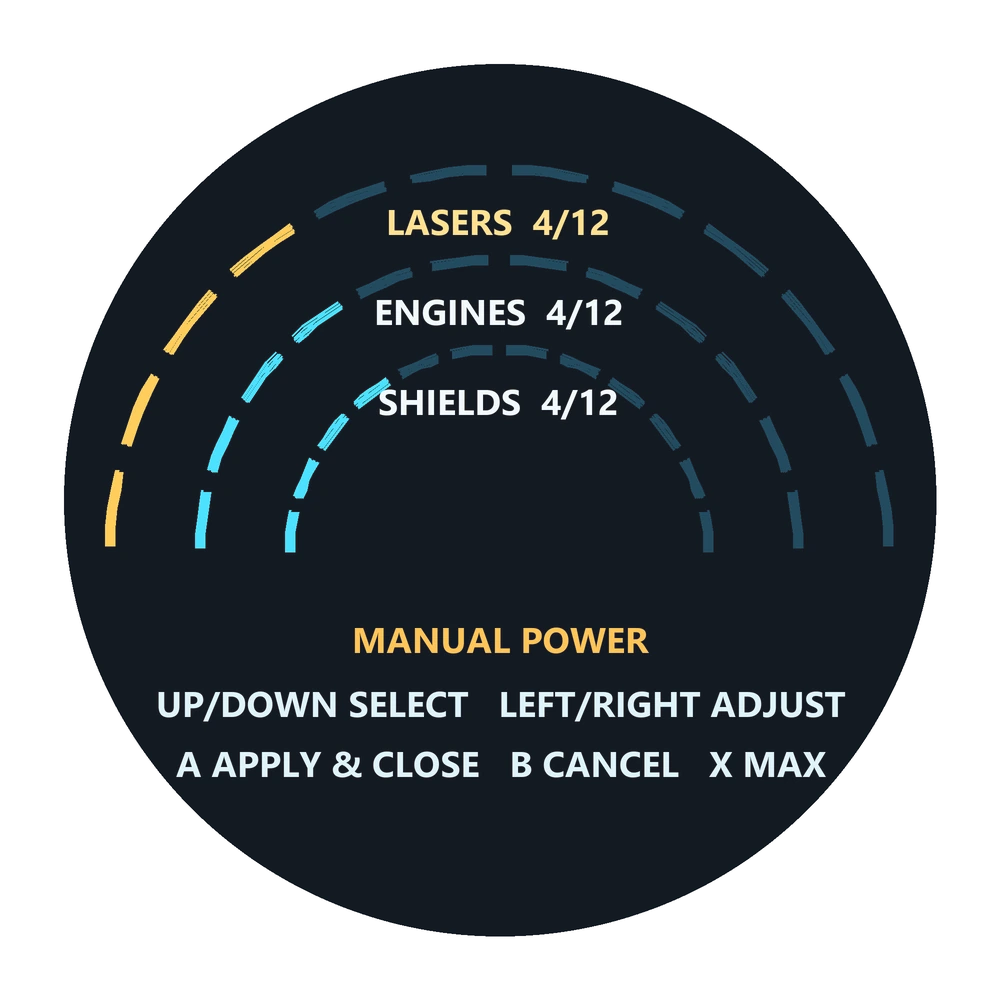
| Input | What it does |
|---|---|
| Stick up / down | Either stick selects an arc |
| Stick left / right | Lowers or raises the selected arc by one point; hold to repeat. Raising takes from the richer of the other two arcs and lowering gives to the poorer, so every step can be undone before you confirm. |
| X | Gives the selected arc all 12 points |
| A | Applies the split and closes the panel |
| B or Y | Cancels without changing anything |
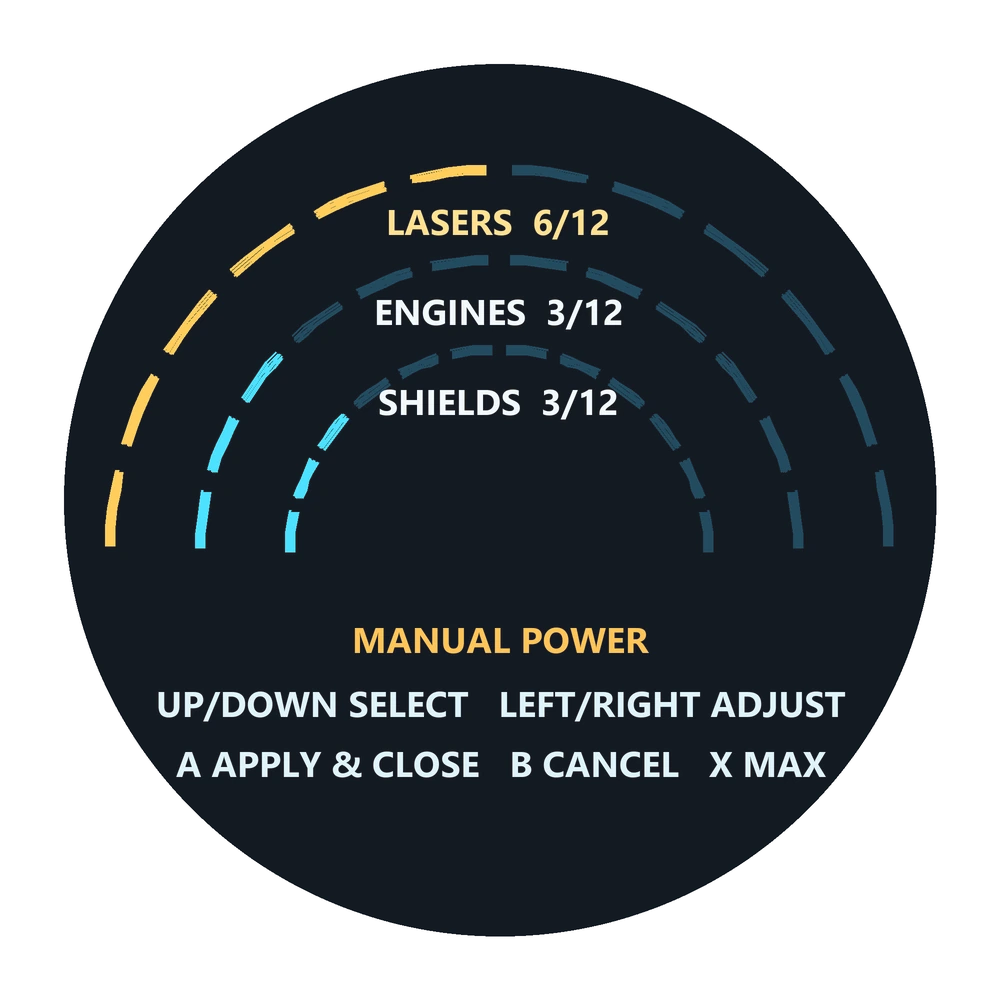
Manual power is single-player only and is unavailable on a ship without an energy-transfer system. If the ship's power changes while the panel is open, A asks you to cancel and try again instead of overwriting it. In the Excoriator tutorial, applying the split also sends the real energy-transfer key so the mission sees it.
Shield allocation #
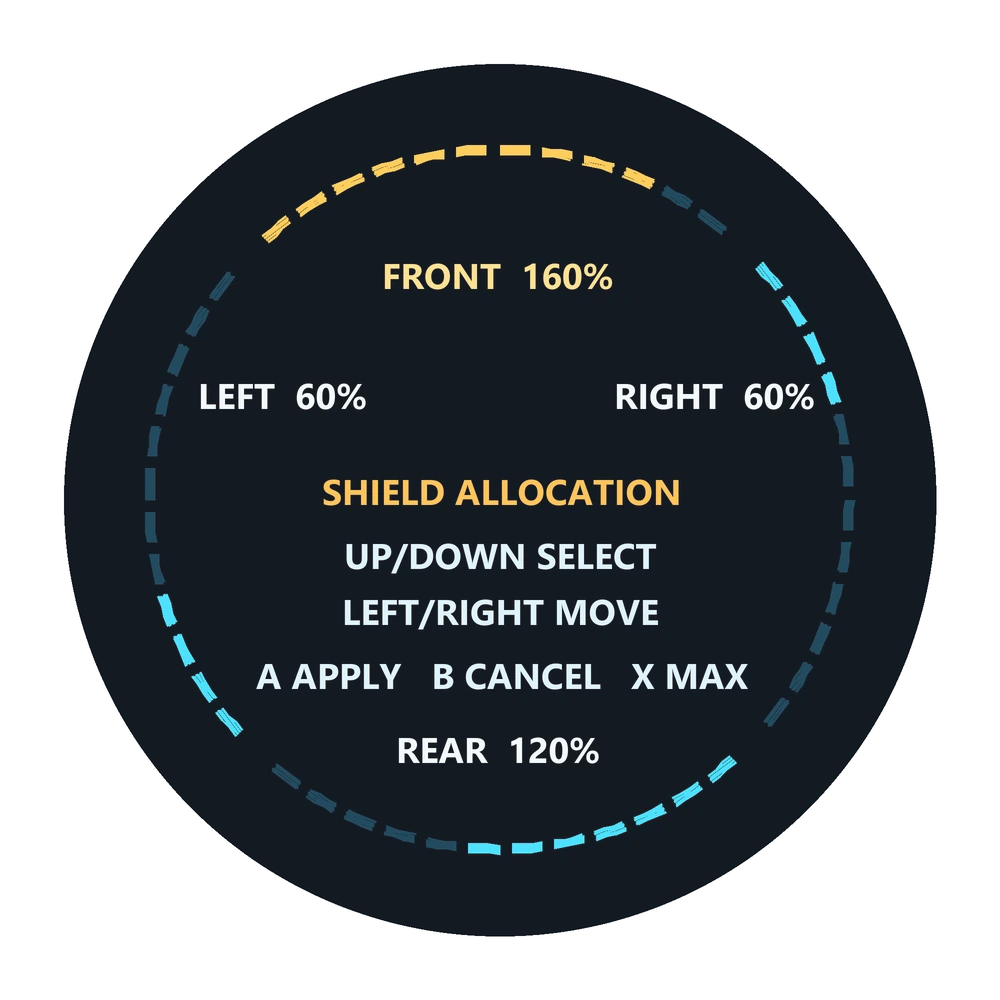
Move shield strength between the sections of your ship. Open the Ship systems wheel and press X. Ships with four shield quadrants show Front, Right, Rear and Left; ships with two sections show Front and Rear. Each section shows a percentage, where 100% is an equal share of your current shields.
| Input | What it does |
|---|---|
| Stick up / down | Selects a section |
| Stick left / right | Moves strength into or out of the selected section, a twelfth of its maximum per step; hold to repeat. Raising takes from the strongest other section and lowering gives to the weakest. A section holds at most double an equal share. |
| X | Fills the selected section as far as the others allow |
| A | Applies the allocation and closes the panel |
| B or Y | Cancels without changing anything |
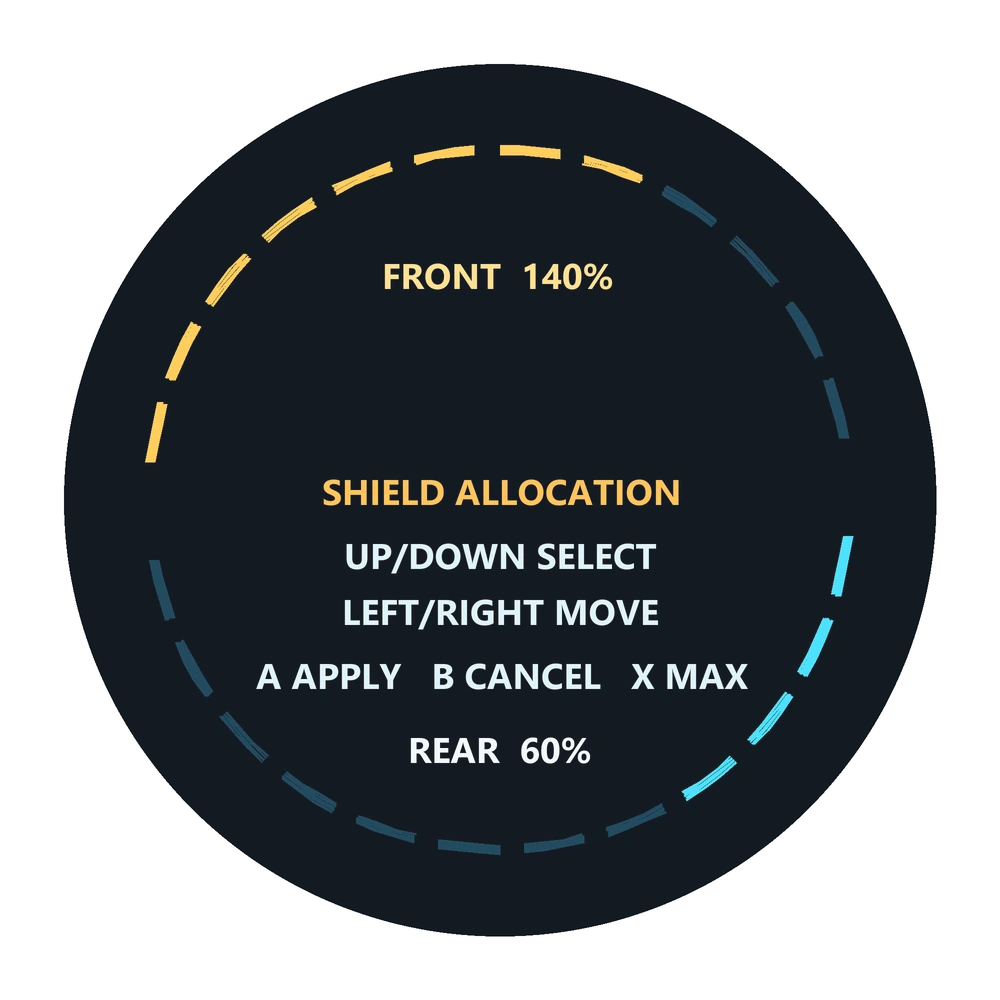
This redistributes the shields you have; it never creates any. Damage and recharge can happen while the panel is open, so your chosen proportions are applied to the shield total at the moment you press A. Shield allocation is single-player only. In the Excoriator tutorial, choosing Front also sends the Alt+W key the mission checks for.
Look around and camera #
Hold a D-pad direction past the configured delay to look up, rear, left or right. Release to centre the view. A short tap still opens the wheel, without a view shift.
- D-pad hold to look sets the delay from 150 to 600 ms (250 ms by default).
- Disable look around makes every D-pad press open its wheel immediately.
- Hold Menu cycles camera (on by default): each 500 ms hold advances Cockpit → Chase → External → Cockpit. Turn it off if you want Menu to pause only.
Menus keep immediate D-pad navigation whatever these settings are. Save Wheel and restart the game after changing them.
Hangar Bay and its Console #
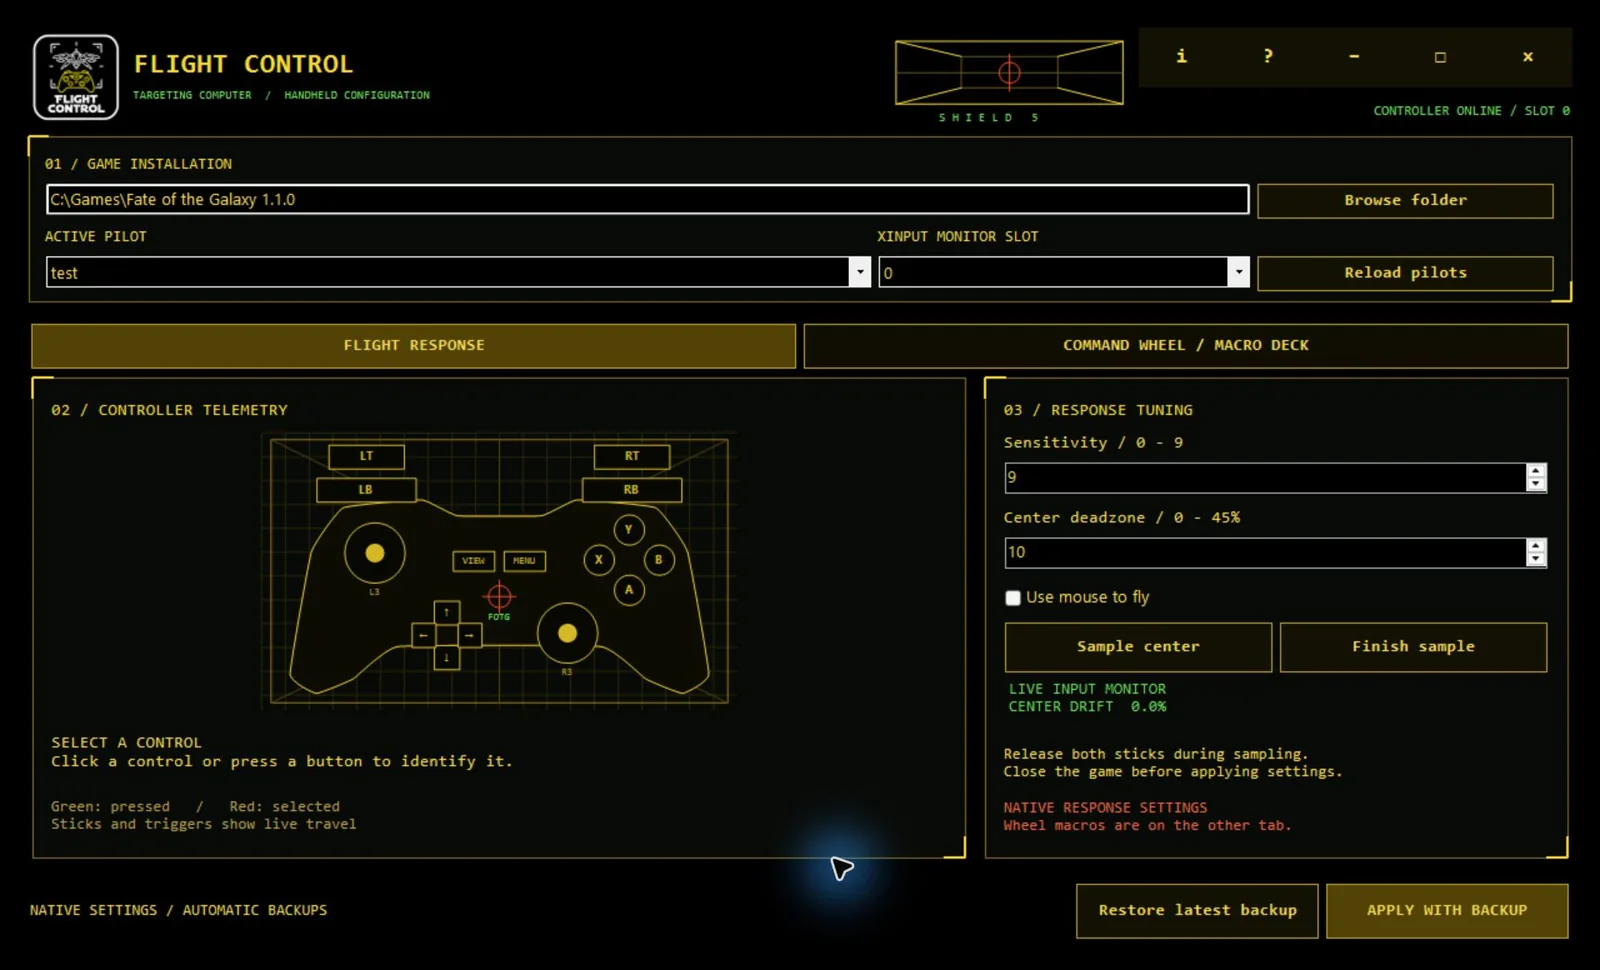
Hangar Bay is the Flight Control app. Open Hangar Bay.exe in the game folder and choose Console for the settings below; Service holds backups, Repair Setup, Choose controller and Remove tool, and Guide is this help. Configure in Setup opens the same Console. Close the game first: saving is blocked while any FreeSpace Open engine is running.
- Check the game folder (the one with
kn_portable). Use Browse folder to correct it. - Choose the Active pilot. Reload pilots refreshes the list after you create one.
- Choose the XInput monitor slot that shows your controller online. This drives the live preview only; it does not change the controller the game uses.
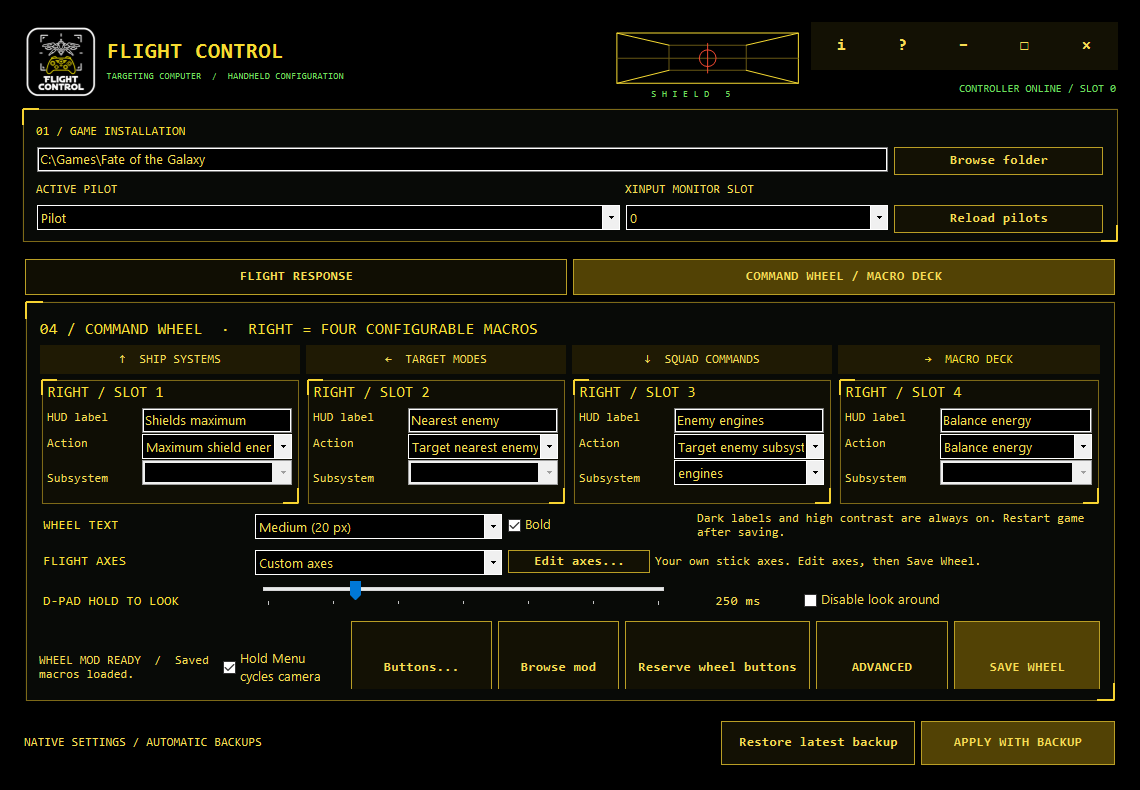
Two tabs hold the settings. Flight Response writes native pilot settings with Apply with backup. Command Wheel / Macro Deck writes the wheel configuration with Save Wheel. Restart the game to load wheel changes. Press F1 or ? in the console for its built-in guide.
Macros #
The four cards on Command Wheel / Macro Deck are the four choices on the D-pad right wheel. Give each a short HUD label and an action:
- Maximum shield energy
- Target nearest enemy
- Target enemy subsystem: engines, weapons, shields, navigation, turrets or sensors
- Match target speed
- Balance energy
- Cycle boarding party task (Assault missions)
Subsystem targeting needs a live, visible enemy with a matching targetable subsystem, and is single-player only. If the target or subsystem isn't valid, the macro shows a message and does nothing. Labels are display text only, never scripts.
Close the game, click Save Wheel, then restart the game. The previous macro file is backed up to FotG_Gamepad_Wheel/ConfigBackups first. If the wheel mod lives somewhere else, use Browse mod to point at its FotG_Gamepad_Wheel folder.
Button actions #
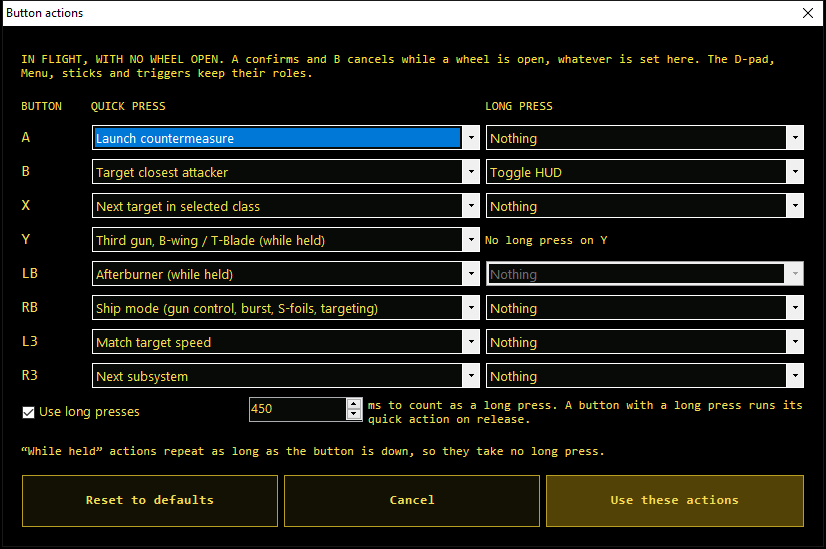
On the Command Wheel / Macro Deck page, Buttons… sets what A, B, X, Y, LB, RB, L3 and R3 do in flight when no wheel is open.
- Quick press: one action per button. The defaults are the 1.0 layout in Flight controls; Reset to defaults brings it back.
- Long press: tick Use long presses to give every button except Y a second action after 250–1000 ms. A button with a long press runs its quick action when you let go.
- While held: the afterburner and the B-wing / T-Blade third gun repeat for as long as the button is down, so they take no long press.
Choices include targeting (reticle, attacker, next in class, nearest enemy or friendly, target's target, newest ship, bombs, subsystems and turrets), match speed, weapon and ship-mode cycling, countermeasures, energy presets, transfers and +/– steps, full or zero throttle, chase and external views, the HUD, radar range, nav points, autopilot and the boarding party task. Nothing leaves a button unused.
A still confirms and B still cancels while a wheel is open, and the D-pad, Menu, sticks and triggers keep their roles. Save Wheel and restart the game to apply changes.
Custom flight axes #
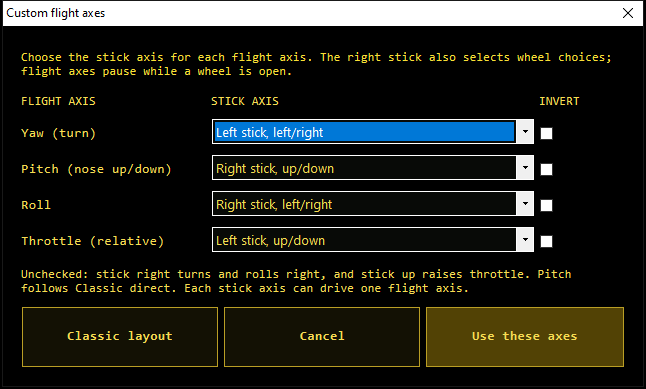
Choose Custom axes under Flight Axes, then Edit axes…. For yaw, pitch, roll and relative throttle, pick a stick axis (either stick, left/right or up/down, or none) and whether to invert it. Unchecked, stick right turns and rolls right, stick up raises throttle, and pitch follows Classic direct. Each stick axis can drive one flight axis.
Save Wheel writes a FotG Custom preset next to the Classic presets, and Install / Repair keeps it. The right stick still selects wheel choices; flight axes pause while a wheel is open. Game's saved setup leaves all axes to the game's own Controls menu instead.
Layouts and profiles #
Advanced layouts
Click Advanced to move top-level wheel choices up or down, or reset a panel. On the Squad tab this reorders only the first communications page; later game menus keep their native order. Use layout keeps your changes in the console until you press Save Wheel.
Share a profile
Export profile saves a portable JSON file with layouts, macros, flight axes, custom axes, wheel text and button actions. It contains no game path or pilot data. Import profile validates a file and loads it for review; Save Wheel and restart to apply it.
Reserve wheel buttons
For a pilot created after installing, close the game and press Reserve wheel buttons once. The console backs up the pilot and settings INI, then clears only joystick buttons 0–5 (A, B, X, Y, LB, RB), 7–9 (Start, L3, R3) and D-pad values 128–131 from that pilot's native bindings. Other bindings and the controller selection stay as they were. Pilots in other formats are left alone.
Flight response #
| Setting | What it does |
|---|---|
| Sensitivity 0–9 | The game's native joystick response |
| Centre deadzone 0–45% | Stick movement ignored around centre. Too much costs fine aim. |
| Use mouse to fly | The game's native mouse-flight option. Leave it off for gamepad flight. |
To measure drift:
- Release both sticks and rest the controller on a stable surface.
- Click Sample center, leave the sticks alone for several seconds, then click Finish sample.
- The suggested deadzone is the largest drift seen plus three points, capped at 45%. If you touched a stick, sample again.
- Close the game, click Apply with backup, and test in flight.
This measures drift in software; it doesn't recalibrate the controller. For the feel of the earlier v1 profile, use sensitivity 5 and deadzone 10%.
Updates #
From 1.1.0, Setup and Configure check manictrashpanda.dev for a newer Flight Control when they open. When one exists:
- Setup shows Update to x.y.z. It downloads the release from this site or the project's GitHub releases, checks its size and SHA-256, and shows the new Setup.exe in File Explorer. Close Setup, run the new one and choose Install / Repair; Flight Control never starts a downloaded program itself; your settings and pilot are kept and backed up.
- Configure offers the update once. Cancel skips that version.
- A newer game version checked with your build can be approved online; Setup then installs for it without the override warning.
The check sends only the request for the update file; no pilot, path or controller data. Turn it off with Check for updates in Setup. Windows may warn that the new Setup is from an unknown publisher because the programs are not code-signed yet.
Restore and uninstall #
Every change to a pilot is backed up first, in timestamped folders under kn_portable/HardLightProductions/FreeSpaceOpen/ControllerSetupBackups.
- Close the game and open the Console in Hangar Bay.
- Select a pilot and press Restore latest backup. This restores the whole pilot file and matching FotG settings INI as they were at backup time, including other settings saved then. Current files are backed up before the restore.
- Repeat for each pilot whose original controls you want back.
- To remove Flight Control, use Service → Remove tool in Hangar Bay. It keeps your pilots and backups. Hangar Bay can't delete its own file while it is open, so it then shows Hangar Bay.exe in File Explorer; delete it after Hangar Bay closes to finish.
The original game launcher works throughout.
PlayStation 5 (DualSense) controllers #
Flight Control reads the controller through XInput, the interface Xbox-style gamepads use. A DualSense isn't an XInput device, so on its own the wheels, the menu controls and Hangar Bay's controller preview won't see it. Until built-in support exists, a translator that makes the DualSense appear to Windows as an Xbox 360 controller does the job. Flight Control doesn't include or install one, and we haven't tested these tools ourselves, so treat the steps below as a starting point.
- Pick a translator. Steam Input: Steam lets you add a program as a non-Steam game and choose an Xbox-style controller layout for it. DS4Windows: free and open source (GPL v3) and it supports the DualSense, but it depends on the ViGEmBus driver, whose development has ended, and its latest release is labelled end-of-life. Both still work for many players. Install drivers only from sources you trust, and never turn off Windows Security or add exclusions to make something run.
- Make Windows see an Xbox 360 controller while the DualSense is connected. If your tool can hide the real DualSense from games, turn that on, so the game doesn't see two controllers.
- Check it in Hangar Bay. Open Console, then Flight Response. The controller diagram should react when you press buttons. If it doesn't, try the other XInput slots (0 to 3).
- Install with the translator running. With the game closed and the translator active, run Setup → Install / Repair, so Setup selects the virtual controller and reads its stick order.
- Start the translator before the game every time, then launch from Hangar Bay.
| DualSense | Flight Control |
|---|---|
| Cross · Circle · Square · Triangle | A · B · X · Y |
| L1 · R1 | LB · RB |
| L2 · R2 | LT · RT |
| L3 · R3 (stick clicks) | L3 · R3 |
| Options | Menu (Start): pause, hold for camera |
| Create | View (Back) |
| D-pad | D-pad: tap for a wheel, hold to look |
The touchpad, gyro, adaptive triggers and light bar aren't used. Built-in DualSense support is planned for a later release, with no date yet. Questions: dev@manictrashpanda.dev.
Troubleshooting #
Setup says “First run required”
The game has no native pilot yet. Launch the unmodified game, create a pilot, exit, then click Check again in Setup.
Setup can't find the game
Click Browse game… and select the Fate of the Galaxy folder that contains kn_portable, not kn_portable itself. If Setup says Game folder not found, the folder you chose has no kn_portable.
Setup says “Unsupported game version”
Flight Control 1.2.0 supports Fate of the Galaxy 1.1.0 to 1.1.3 and 2.0.2, and Setup names the version it found. After a game update, check for a Flight Control update first. If you know the new version works, tick Override version check: Setup warns that compatibility cannot be guaranteed until Flight Control is updated for that version, then installs. It still checks the game's control defaults and changes nothing if it does not recognise them.
The game reports “N warnings and/or errors during program startup”
Flight Control 1.0.x caused up to 8 of these: the engine added a flag to each flight axis itself and counted a warning each time. They did not affect flying. Install 1.1.0 with Install / Repair to remove them. If the message remains, it comes from elsewhere; tell us at dev@manictrashpanda.dev.
Setup says “found, but not its FSO 26.0.1 SDL3 engine”
That message comes from Flight Control 1.1.0 and earlier, which only knew the SDL3 engine package from FotG 1.1.0. A clean FotG 1.1.1 or 1.1.2 install uses the standard FSO 26.0.1 engine instead. Install Flight Control 1.1.4 or later; your game is fine.
Microsoft Defender flagged Setup.exe
Defender detected Wacatac.B!ml in the 1.1.1 Setup.exe. Delete that download and get 1.2.0, which installs without starting PowerShell. Don't disable Defender or add an exclusion. If 1.1.4 is flagged too, email the detection name, Windows version and the file's SHA-256 to dev@manictrashpanda.dev. See SECURITY.md.
Setup says “Game engine not found”
The game is there but no FSO engine was found in kn_portable\Library\bin. Launch the game once from Knossos, or use Modify → Verify there, so it installs the engine, then click Check again.
Sticks steer the wrong axes
Run Install / Repair again with the controller connected, so Setup can detect it and its stick layout and select it in the wheel profile. Then check that Flight Axes is Classic direct (tested), press Save Wheel and restart the game. An old controller ID in the wheel profile caused this in earlier test builds.
Buttons fire two actions at once
The pilot's original bindings are still active. Close the game, select the pilot in the console and press Reserve wheel buttons. New pilots always need this once.
No wheel appears, or changes don't show in game
Start the game with Play with Gamepad Wheel.exe, not the original launcher, and make sure the bridge icon is in the tray. Wheel settings load at start-up, so restart the game after Save Wheel.
The console shows no controller
Try XInput slots 0–3 and make sure a handheld PC is in gamepad mode, not mouse or desktop mode.
Save, reserve or restore is blocked
Close every FreeSpace Open engine window. The console won't write pilot or wheel files while the game is running.
A macro or order does nothing
The wheel uses the game's own order list and can't force an order the mission forbids. Energy and subsystem actions work in single player only, and subsystem targeting needs a valid visible target.
Help, About or the icon is missing
Extract the complete ZIP, not just the EXE files, and keep the folders together.
Tested so far #
Flight Control works with Fate of the Galaxy 1.1.0 to 1.1.3 and 2.0.2, on handhelds, Xbox controllers and generic gamepads. It is VR ready: its own VR mode draws the wheels in the cockpit, separate from the game's built-in VR support. The 1.1.0 button and axis options pass automated and in-game startup checks; flight tests of every option are under way. Testing has focused extensively on practice missions, refining how the controls feel while flying. A full campaign playthrough and multiplayer have not yet been tested, so you may find:
- Mission-specific menus or screens that need the stick pointer
- Squad orders or macros that behave differently in campaign missions
- Multiplayer behaviour that hasn’t been checked
This is the first public release. Put it through campaign missions, try your own configurations, and send bugs, awkward interactions or ideas for improvement to dev@manictrashpanda.dev. The full test checklist is on GitHub.
Report a problem #
Bugs, awkward interactions and ideas are all welcome. Email dev@manictrashpanda.dev or open an issue on GitHub. For a bug, include:
- Game version, Windows version and controller model
- Ship and mission
- Whether you launched with Play with Gamepad Wheel.exe
- The exact steps that lead to the problem
Please don't post pilot files, logs or screenshots that show personal paths or names in public issues.
Credits and licenses #
Flight Control (FotG Gamepad Wheel) is by Manic Trash Panda, coded with ChatGPT.
Fate of the Galaxy was created by its volunteer development team. FreeSpace Open is developed by the FreeSpace Source Code Project; Flight Control uses its Lua scripting interface and includes no engine binary. Star Wars and related names belong to Lucasfilm Ltd. and Disney. Flight Control is an independent, unofficial fan tool, not affiliated with or endorsed by any of them.
The original code, companion programs and documentation are under the MIT License. The Flight Control emblem may be shown and redistributed only with this tool, under its artwork terms. Neither covers the game, the engine, or third-party names and material. Source: github.com/wray2064/FotGFlightControl.